
Note: Substantial parts of the code described here have been created during my working relationship with Truststone Software GmbH.
Edge detection is a very common task in various app types. I had assumed that there must be an easy solution in Flutter to perform that common task. However, at the time of writing (2020-09-07), this is not the case. The solutions I found were:
- edge_detection package: sounds promising from the description, but has at least one major flaw: it doesn’t provide an API that expects an image and returns the detected edges. Instead, it leads the user to a native screen in which he can perform predefined actions. This makes it completely useless for most of the use cases at least in the business context because it leaves the developer unable to define the layout and design of the screen. ****Apps are mostly branded and require individual screen designs
- opencv package: the idea of having OpenCV bindings available in the Flutter context is appealing. However, iOS is unsupported which also makes it unusable for professional apps. Also, one would have to translate existing examples on the web written in C++, Java or Python into the dart commands that also have differing data types. Another problem is that not every command seems to be translated
- Using platform channel to call native code. This would lead to a lot of code duplication between the Android and iOS part
This tutorial describes how to implement an app that lets you use the phone’s camera to take a picture or choose one from the gallery. It then displays the detected edges on this picture. The app will be fully functional on iOS and Android and will only have one code base.
Let’s describe the properties and features of the app we want to implement
- A screen with a camera preview that has two buttons: take a photo and choose in image from the gallery
- A screen that appears when an image was taken or chosen that displays the image and renders the detected edges on top
- There is a button that lets the user return from the edge screen to the main screen
- The UI must not be blocked during edge detection. Instead, the image is shown already and the edges appear once the process is finished
Concept
Because we want the detection to happen in native C++ in order to have a single code base, we need to make use of the Dart foreign function interface or dart:ffi.

The call chain happens as follows: in our main widget, we give the user the ability to choose a photo. The path of the photo is being forwarded to our C/C++ Bridge. This is the last class that actually contains Dart code. It converts the given string (image path) to a format our C-Code understands. It also loads the shared library we will create from our C++ source files. There the image is being loaded from file system to check if exists. If it does, the Mat (native data type of OpenCV) is passed to the respective OpenCV functions that perform the actual edge detection. The list of list of Point is then passed back to the entry point of our native code, which converts it to a DetectionResult which is essentially a C++ struct with four doubles (representing the relative position of the four edges). The C/C++ bridge puts that information into a Dart type (EdgeDetectionResult) and passed it back to our widget where this piece of information is used to render the edges on top of our image.
Implementation
We are going to split this part of the tutorial in two sub parts: project setup, native implementation / ffi, Flutter widget implementation. Let’s start with the project setup.
Project setup
We want this to be a package to be able to integrate it in any Flutter project we want. That’s why we start by generating the project as follows:
1flutter create --org dev.flutterclutter --template=plugin --platforms=android,ios simple_edge_detection
More information about this can be found here. We want to develop the plugin for both iOS and android, that’s a necessary argument.
Download OpenCV

We then head over to the OpenCV releases and download the iOS pack which comes in form of a framework and the Android code.
Next, we need to extract the archives and copy the contents as follows into our project directory:
1cp -R sdk/native/jni/include project_root
2cp sdk/native/libs/* project_root/android/src/main/jniLibs/*
Where project_root is the directory called simple_edge_detection which resides at the location where we executed the flutter create command.
Why exactly these directories, you might ask yourself. When librarie are placed in the jniLibs folder, they are automatically included during build. It’s also possible to override this behavior by editing the build.gradle.
For iOS, we also need to copy the sources:
1cp -R opencv2.framework project_root/ios
Our project directory now looks like this:
 1native_opencv
 2  - android
 3    - src
 4      - main
 5        - jniLibs
 6          - arm64-v8a
 7            - libopencv_java4.so
 8          - armeabi-v7a
 9            - libopencv_java4.so
10          - x86
11            - libopencv_java4.so
12          - x86_64
13            - libopencv_java4.so
14  - include
15    - opencv2
16      - ...
Build setup Android
No we need to tell Gradle to build the app in the way that the C++ code we are going to write is accessible from the Dart context as a library.
 1android {
 2    compileSdkVersion 28
 3
 4    sourceSets {
 5        main.java.srcDirs += 'src/main/kotlin'
 6    }
 7    defaultConfig {
 8        minSdkVersion 16
 9    }
10    lintOptions {
11        disable 'InvalidPackage'
12    }
13    externalNativeBuild {
14        cmake {
15            path "CMakeLists.txt"
16        }
17    }
18    defaultConfig {
19        externalNativeBuild {
20            cmake {
21                cppFlags '-frtti -fexceptions -std=c++11'
22                arguments "-DANDROID_STL=c++_shared"
23            }
24        }
25    }
26}
The most import part is within externalNativeBuild because it tells Gradle where the CMakeLists is located. This file has build instructions that link our code with OpenCV.
The cmake flags enable Run-Time Type Information, exceptions and tells it to compile the program with C++11. The argument -DANDROID_STL=c++_shared is responsible for enabling the usage of shared C++ runtime in shared libraries.
Now we need to create the CMakeLists.txt we have just referenced.
 1cmake_minimum_required(VERSION 3.6.0)
 2include_directories(../include)
 3add_library(lib_opencv SHARED IMPORTED)
 4set_target_properties(lib_opencv PROPERTIES IMPORTED_LOCATION ${CMAKE_CURRENT_SOURCE_DIR}/src/main/jniLibs/${ANDROID_ABI}/libopencv_java4.so)
 5set(EDGE_DETECTION_DIR "../ios/Classes")
 6set(SOURCES
 7    ${EDGE_DETECTION_DIR}/native_edge_detection.cpp
 8    ${EDGE_DETECTION_DIR}/edge_detector.cpp
 9)
10add_library(native_edge_detection SHARED ${SOURCES})
11target_link_libraries(native_edge_detection lib_opencv)
We mainly link our sources with the OpenCV library here and make it a library that can be called from our Dart code.
You might stumble across set(EDGE_DETECTION_DIR "../ios/Classes") and ask yourself why the ios directory in the cmake file for the Android targets. We need to put our C/C++ sources there because we’ll be using CocoaPods (the packet manager of the iOS App ecosystem). CocoaPods can only reference source code from directories at the same level of the .podspec file or below. Looks a little bit hacky because the code base is used for both platforms but the Android build system is a little bit more tolerant in this regard and we can reference the sources within the ios folder from here.
There are two sources: native_edge_detection.cpp and edge_detector.cpp. These are the names our C++ sources will have. native_edge_detection.cpp is going to be our entry point from FFI and edge_detector.cpp will contain the actual logic of the edge detection and call OpenCV.
Build setup iOS
Now that we are finished with setting up the build system for Android, let’s continue with iOS before we actually write the native code. This requires a few changes in the .simple_edge_detection.podspec file.
 1#
 2# To learn more about a Podspec see http://guides.cocoapods.org/syntax/podspec.html.
 3# Run `pod lib lint simple_edge_detection.podspec' to validate before publishing.
 4#
 5Pod::Spec.new do |s|
 6  s.name             = 'simple_edge_detection'
 7  s.version          = '0.0.1'
 8  s.summary          = 'A new flutter plugin project.'
 9  s.description      = <<-DESC
10A new flutter plugin project.
11                       DESC
12  s.homepage         = 'http://example.com'
13  s.license          = { :file => '../LICENSE' }
14  s.author           = { 'Your Company' => 'email@example.com' }
15  s.source           = { :path => '.' }
16  s.source_files = 'Classes/**/*.{swift,c,m,h,mm,cpp,plist}'
17  s.dependency 'Flutter'
18  s.platform = :ios, '8.0'
19
20  # Flutter.framework does not contain a i386 slice. Only x86_64 simulators are supported.
21  s.pod_target_xcconfig = { 'DEFINES_MODULE' => 'YES', 'VALID_ARCHS[sdk=iphonesimulator*]' => 'x86_64' }
22  s.swift_version = '5.0'
23
24  s.preserve_paths = 'opencv2.framework'
25  s.xcconfig = { 'OTHER_LDFLAGS' => '-framework opencv2' }
26  s.vendored_frameworks = 'opencv2.framework'
27  s.frameworks = 'AVFoundation'
28  s.library = 'c++'
29end
This is what your .podspec file should look like. Everything below s.swift_version='5.0' was added by us.
We tell CocoaPods not to remove opencv in the build process by using s.preserve_paths. We then instruct the linker to include OpenCV2 which it can find because we placed the framework in the ios folder earlier. OpenCV2 needs AVFoundation, which is the camera abstraction on iOS. That’s because the video camera interface is basically just a wrapper around that.
One important notice: the line
1s.source_files = 'Classes/**/*<em>/</em>.{swift,c,m,h,mm,cpp,plist}
was changed to
1s.source_files = Classes/**/*<em>/</em>.{swift,c,m,h,mm,cpp,plist}
That’s because otherwise the header files will be imported twice (as there is no file filter) which prevents the build process to work properly.
Implementing native edge detection using C++
Now we are done with the setup. We proceed by implementing the actual native code both of the platforms will be sharing.
We start with the native implementation by creating the entry point called native_edge_detection.
 1struct Coordinate
 2{
 3    double x;
 4    double y;
 5};
 6
 7struct DetectionResult
 8{
 9    Coordinate* topLeft;
10    Coordinate* topRight;
11    Coordinate* bottomLeft;
12    Coordinate* bottomRight;
13};
14
15extern "C"
16struct DetectionResult *detect_edges(char *str);
We define two structs that are used to represent the result of our process. Coordinate is just a Point with relative X and Y coordinates. DetectionResults has four of these types as properties. They will represent the four corners of our edge detection result. Our class will only have one public method called detect_edges that receives a string representing the path to our image file and returns a DetectionResult.
The FFI library is able call C symbols but we are writing C++ code. That’s why we mark these symbols extern C.
 1#include "native_edge_detection.hpp"
 2#include "edge_detector.hpp"
 3#include <stdlib.h>
 4#include <opencv2/opencv.hpp>
 5
 6extern "C" __attribute__((visibility("default"))) __attribute__((used))
 7struct Coordinate *create_coordinate(double x, double y)
 8{
 9    struct Coordinate *coordinate = (struct Coordinate *)malloc(sizeof(struct Coordinate));
10    coordinate->x = x;
11    coordinate->y = y;
12    return coordinate;
13}
14
15extern "C" __attribute__((visibility("default"))) __attribute__((used))
16struct DetectionResult *create_detection_result(Coordinate *topLeft, Coordinate *topRight, Coordinate *bottomLeft, Coordinate *bottomRight)
17{
18    struct DetectionResult *detectionResult = (struct DetectionResult *)malloc(sizeof(struct DetectionResult));
19    detectionResult->topLeft = topLeft;
20    detectionResult->topRight = topRight;
21    detectionResult->bottomLeft = bottomLeft;
22    detectionResult->bottomRight = bottomRight;
23    return detectionResult;
24}
25
26extern "C" __attribute__((visibility("default"))) __attribute__((used))
27struct DetectionResult *detect_edges(char *str) {
28    struct DetectionResult *coordinate = (struct DetectionResult *)malloc(sizeof(struct DetectionResult));
29    cv::Mat mat = cv::imread(str);
30
31    if (mat.size().width == 0 || mat.size().height == 0) {
32        return create_detection_result(
33            create_coordinate(0, 0),
34            create_coordinate(1, 0),
35            create_coordinate(0, 1),
36            create_coordinate(1, 1)
37        );
38    }
39
40    vector<cv::Point> points = EdgeDetector::detect_edges(mat);
41
42    return create_detection_result(
43        create_coordinate((double)points[0].x / mat.size().width, (double)points[0].y / mat.size().height),
44        create_coordinate((double)points[1].x / mat.size().width, (double)points[1].y / mat.size().height),
45        create_coordinate((double)points[2].x / mat.size().width, (double)points[2].y / mat.size().height),
46        create_coordinate((double)points[3].x / mat.size().width, (double)points[3].y / mat.size().height)
47    );
48}
The strange looking visibility attributes prevent the linker from discarding the symbols during link-time optimization which make them callable from Dart.
The first thing we do is reading the image using cv::imread() if the size and with are 0 meaning there is no valid image at this path, we return a DetectionResult that spans over the whole image dimensions (remember, the coordinates are relative).
Otherwise, we forward the image as a Mat to the heart of our detection called EdgeDetector. The resulting points are absolute so we divide them by width and height of our image to ensure they are relative. That will make our life easier later on in the Flutter widget because if the displayed image is smaller than the original size of the image (which can happen if at least one side exceeds the dimensions of the screen), we don’t need to calculate the relative scaling factor.
Now let’s have a look at our EdgeDetector. I will not explain every line of code in detail because this is still a Flutter tutorial and the C++ algorithm to detect the edges is only exemplary.
 1#include <opencv2/opencv.hpp>
 2
 3using namespace cv;
 4using namespace std;
 5
 6
 7class EdgeDetector {
 8    public:
 9    static vector<cv::Point> detect_edges( Mat& image);
10    static Mat debug_squares( Mat image );
11
12    private:
13    static double get_cosine_angle_between_vectors( cv::Point pt1, cv::Point pt2, cv::Point pt0 );
14    static vector<vector<cv::Point> > find_squares(Mat& image);
15    static float get_width(vector<cv::Point>& square);
16    static float get_height(vector<cv::Point>& square);
17};
The only public methods we provide are detect_edges which is the method we have just called in the other class. I used debug_squares during development to debug the output when I had strange results. This method paints the detected edges onto the original image and returns it. If you experience unexpected results like too small or too big rectangles, you might use this method in order to find out what’s going on.
  1#include "edge_detector.hpp"
  2
  3#include <opencv2/opencv.hpp>
  4#include <opencv2/imgproc/types_c.h>
  5
  6using namespace cv;
  7using namespace std;
  8
  9// helper function:
 10// finds a cosine of angle between vectors
 11// from pt0->pt1 and from pt0->pt2
 12double EdgeDetector::get_cosine_angle_between_vectors(cv::Point pt1, cv::Point pt2, cv::Point pt0)
 13{
 14    double dx1 = pt1.x - pt0.x;
 15    double dy1 = pt1.y - pt0.y;
 16    double dx2 = pt2.x - pt0.x;
 17    double dy2 = pt2.y - pt0.y;
 18    return (dx1*dx2 + dy1*dy2)/sqrt((dx1*dx1 + dy1*dy1)*(dx2*dx2 + dy2*dy2) + 1e-10);
 19}
 20
 21vector<cv::Point> image_to_vector(Mat& image)
 22{
 23    int imageWidth = image.size().width;
 24    int imageHeight = image.size().height;
 25
 26    return {
 27        cv::Point(0, 0),
 28        cv::Point(imageWidth, 0),
 29        cv::Point(0, imageHeight),
 30        cv::Point(imageWidth, imageHeight)
 31    };
 32}
 33
 34vector<cv::Point> EdgeDetector::detect_edges(Mat& image)
 35{
 36    vector<vector<cv::Point>> squares = find_squares(image);
 37    vector<cv::Point>* biggestSquare = NULL;
 38
 39    // Sort so that the points are ordered clockwise
 40
 41    struct sortY {
 42        bool operator() (cv::Point pt1, cv::Point pt2) { return (pt1.y < pt2.y);}
 43    } orderRectangleY;
 44    struct sortX {
 45        bool operator() (cv::Point pt1, cv::Point pt2) { return (pt1.x < pt2.x);}
 46    } orderRectangleX;
 47
 48    for (int i = 0; i < squares.size(); i++) {
 49        vector<cv::Point>* currentSquare = &squares[i];
 50
 51        std::sort(currentSquare->begin(),currentSquare->end(), orderRectangleY);
 52        std::sort(currentSquare->begin(),currentSquare->begin()+2, orderRectangleX);
 53        std::sort(currentSquare->begin()+2,currentSquare->end(), orderRectangleX);
 54
 55        float currentSquareWidth = get_width(*currentSquare);
 56        float currentSquareHeight = get_height(*currentSquare);
 57
 58        if (currentSquareWidth < image.size().width / 5 || currentSquareHeight < image.size().height / 5) {
 59            continue;
 60        }
 61
 62        if (currentSquareWidth > image.size().width * 0.99 || currentSquareHeight > image.size().height * 0.99) {
 63            continue;
 64        }
 65
 66        if (biggestSquare == NULL) {
 67            biggestSquare = currentSquare;
 68            continue;
 69        }
 70
 71        float biggestSquareWidth = get_width(*biggestSquare);
 72        float biggestSquareHeight = get_height(*biggestSquare);
 73
 74        if (currentSquareWidth * currentSquareHeight >= biggestSquareWidth * biggestSquareHeight) {
 75            biggestSquare = currentSquare;
 76        }
 77
 78    }
 79
 80    if (biggestSquare == NULL) {
 81        return image_to_vector(image);
 82    }
 83
 84    std::sort(biggestSquare->begin(),biggestSquare->end(), orderRectangleY);
 85    std::sort(biggestSquare->begin(),biggestSquare->begin()+2, orderRectangleX);
 86    std::sort(biggestSquare->begin()+2,biggestSquare->end(), orderRectangleX);
 87
 88    return *biggestSquare;
 89}
 90
 91float EdgeDetector::get_height(vector<cv::Point>& square) {
 92    float upperLeftToLowerRight = square[3].y - square[0].y;
 93    float upperRightToLowerLeft = square[1].y - square[2].y;
 94
 95    return max(upperLeftToLowerRight, upperRightToLowerLeft);
 96}
 97
 98float EdgeDetector::get_width(vector<cv::Point>& square) {
 99    float upperLeftToLowerRight = square[3].x - square[0].x;
100    float upperRightToLowerLeft = square[1].x - square[2].x;
101
102    return max(upperLeftToLowerRight, upperRightToLowerLeft);
103}
104
105cv::Mat EdgeDetector::debug_squares( cv::Mat image )
106{
107    vector<vector<cv::Point> > squares = find_squares(image);
108
109    for (const auto & square : squares) {
110        // draw rotated rect
111        cv::RotatedRect minRect = minAreaRect(cv::Mat(square));
112        cv::Point2f rect_points[4];
113        minRect.points( rect_points );
114        for ( int j = 0; j < 4; j++ ) {
115            cv::line( image, rect_points[j], rect_points[(j+1)%4], cv::Scalar(0,0,255), 1, 8 ); // blue
116        }
117    }
118
119    return image;
120}
121
122vector<vector<cv::Point> > EdgeDetector::find_squares(Mat& image)
123{
124    vector<int> usedThresholdLevel;
125    vector<vector<Point> > squares;
126
127    Mat gray0(image.size(), CV_8U), gray;
128
129    cvtColor(image , gray, COLOR_BGR2GRAY);
130    medianBlur(gray, gray, 3);      // blur will enhance edge detection
131    vector<vector<cv::Point> > contours;
132
133    int thresholdLevels[] = {10, 30, 50, 70};
134    for(int thresholdLevel : thresholdLevels) {
135        Canny(gray, gray0, thresholdLevel, thresholdLevel*3, 3); // max thres: 100  // *3 => recommended setting
136
137        // Dilate helps to remove potential holes between edge segments
138        dilate(gray0, gray0, Mat(), Point(-1, -1));
139
140        // Find contours and store them in a list
141        findContours(gray0, contours, CV_RETR_LIST, CV_CHAIN_APPROX_SIMPLE);
142
143        // Test contours
144        vector<Point> approx;
145        for (const auto & contour : contours) {
146            // approximate contour with accuracy proportional
147            // to the contour perimeter
148            approxPolyDP(Mat(contour), approx, arcLength(Mat(contour), true) * 0.02, true);
149
150            // Note: absolute value of an area is used because
151            // area may be positive or negative - in accordance with the
152            // contour orientation
153            if (approx.size() == 4 && fabs(contourArea(Mat(approx))) > 1000 &&
154                isContourConvex(Mat(approx))) {
155                double maxCosine = 0;
156
157                for (int j = 2; j < 5; j++) {
158                    double cosine = fabs(get_cosine_angle_between_vectors(approx[j % 4], approx[j - 2], approx[j - 1]));
159                    maxCosine = MAX(maxCosine, cosine);
160                }
161
162                if (maxCosine < 0.3) {
163                    squares.push_back(approx);
164                    usedThresholdLevel.push_back(thresholdLevel);
165                }
166            }
167        }
168    }
169
170    return squares;
171}
This is a lot of code, but the relevant part is basically taken from Stackoverflow. I enhanced it by ruling out too small detection results and ordering the rectangles so that their points are always returned in a clockwise matter starting from the top left point.
We store the above classes as edge_detector.hpp and edge_detector.cpp respectively.
There’s only one thing left to do before we are done with the package and can continue with actually calling our edge detection from a Flutter widget: we need to write the class that makes use of the ffi package to call the library we have just implemented. We call this bridge class edge_detection.dart, put it in the lib folder as the only file of our plugin and make it look like this:
 1import 'dart:async';
 2import 'dart:ffi';
 3import 'dart:io';
 4import 'dart:ui';
 5import 'package:ffi/ffi.dart';
 6import 'package:flutter/material.dart';
 7
 8
 9class Coordinate extends Struct {
10  @Double()
11  double x;
12
13  @Double()
14  double y;
15
16  factory Coordinate.allocate(double x, double y) =>
17      allocate<Coordinate>().ref
18        ..x = x
19        ..y = y;
20}
21
22class NativeDetectionResult extends Struct {
23  Pointer<Coordinate> topLeft;
24  Pointer<Coordinate> topRight;
25  Pointer<Coordinate> bottomLeft;
26  Pointer<Coordinate> bottomRight;
27
28  factory NativeDetectionResult.allocate(
29      Pointer<Coordinate> topLeft,
30      Pointer<Coordinate> topRight,
31      Pointer<Coordinate> bottomLeft,
32      Pointer<Coordinate> bottomRight) =>
33      allocate<NativeDetectionResult>().ref
34        ..topLeft = topLeft
35        ..topRight = topRight
36        ..bottomLeft = bottomLeft
37        ..bottomRight = bottomRight;
38}
39
40class EdgeDetectionResult {
41  EdgeDetectionResult({
42    @required this.topLeft,
43    @required this.topRight,
44    @required this.bottomLeft,
45    @required this.bottomRight,
46  });
47
48  Offset topLeft;
49  Offset topRight;
50  Offset bottomLeft;
51  Offset bottomRight;
52}
53
54typedef DetectEdgesFunction = Pointer<NativeDetectionResult> Function(
55  Pointer<Utf8> x
56);
57
58class EdgeDetection {
59  static Future<EdgeDetectionResult> detectEdges(String path) async {
60    DynamicLibrary nativeEdgeDetection = _getDynamicLibrary();
61
62    final detectEdges = nativeEdgeDetection
63        .lookup<NativeFunction<DetectEdgesFunction>>("detect_edges")
64        .asFunction<DetectEdgesFunction>();
65
66    NativeDetectionResult detectionResult = detectEdges(Utf8.toUtf8(path)).ref;
67
68    return EdgeDetectionResult(
69        topLeft: Offset(
70            detectionResult.topLeft.ref.x, detectionResult.topLeft.ref.y
71        ),
72        topRight: Offset(
73            detectionResult.topRight.ref.x, detectionResult.topRight.ref.y
74        ),
75        bottomLeft: Offset(
76            detectionResult.bottomLeft.ref.x, detectionResult.bottomLeft.ref.y
77        ),
78        bottomRight: Offset(
79            detectionResult.bottomRight.ref.x, detectionResult.bottomRight.ref.y
80        )
81    );
82  }
83
84  static DynamicLibrary _getDynamicLibrary() {
85    final DynamicLibrary nativeEdgeDetection = Platform.isAndroid
86        ? DynamicLibrary.open("libnative_edge_detection.so")
87        : DynamicLibrary.process();
88    return nativeEdgeDetection;
89  }
90}
The structs we defined in the C/C++ code also need to be defined here because we have to determine the return value of the method we are calling. That’s why we create classes that extend the Struct class. If you want to know more about how to exchange data via ffi, have a look at this official example.
We also create a class called EdgeDetectionResult that holds essentially the same information as our DetectionResult class but with well-known data types of the Flutter world. We represent the points using the Offset class.
Because C does not know strings, we need to use a char pointer (PointerDynamicLibrary to call our native library. This is always the name of our entry class (native_edge_detection), prefixed by lib and with so as file ending. For more information on how to call native libraries have a look at the official docs.
We used the ffi package in the above class so we need to import that package into our project by editing the pubspec.yml
Implementing the Flutter widgets
Now we are done with all the prerequisites. We implemented a package (plugin) we can use in any Flutter project to detect edges on a given image. Let’s use that to implement the goal we described at the beginning of this article.
For that, we create a new project edge_detection_sample that resides in the same directory as our package.
In the pubspec.yml, we import that local package like this:
1dependencies:
2  flutter:
3    sdk: flutter
4  camera: ^0.5.8+5
5  path_provider: ^1.6.14
6  image_picker: ^0.6.7+7
7
8  simple_edge_detection:
9    path: ../simple_edge_detection/
As you can see, we also need the camera, path_provider and image_picker. That’s because we we want to let the app detect the edges of either the camera or an image from the gallery.
Let’s start with a widget called Scan. This is the place where the user should be able to scan e. g. a sheet of paper either from the camera or from the gallery.
  1class Scan extends StatefulWidget {
  2  @override
  3  _ScanState createState() => _ScanState();
  4}
  5
  6class _ScanState extends State<Scan> {
  7  CameraController controller;
  8  List<CameraDescription> cameras;
  9  String imagePath;
 10  EdgeDetectionResult edgeDetectionResult;
 11
 12  @override
 13  void initState() {
 14    super.initState();
 15    checkForCameras().then((value) {
 16      _initializeController();
 17    });
 18  }
 19
 20  @override
 21  Widget build(BuildContext context) {
 22    return Scaffold(
 23      body: Stack(
 24        children: <Widget>[
 25          _getMainWidget(),
 26          _getBottomBar(),
 27        ],
 28      ),
 29    );
 30  }
 31
 32  Widget _getMainWidget() {
 33    if (imagePath == null && edgeDetectionResult == null) {
 34      return CameraView(
 35        controller: controller
 36      );
 37    }
 38
 39    return EdgeDetectionPreview(
 40      imagePath: imagePath,
 41      edgeDetectionResult: edgeDetectionResult,
 42    );
 43  }
 44
 45  Future<void> checkForCameras() async {
 46    cameras = await availableCameras();
 47  }
 48
 49  void _initializeController() {
 50    if (cameras.length == 0) {
 51      log('No cameras detected');
 52      return;
 53    }
 54
 55    controller = CameraController(
 56        cameras[0],
 57        ResolutionPreset.max,
 58        enableAudio: false
 59    );
 60    controller.initialize().then((_) {
 61      if (!mounted) {
 62        return;
 63      }
 64      setState(() {});
 65    });
 66  }
 67
 68  @override
 69  void dispose() {
 70    controller?.dispose();
 71    super.dispose();
 72  }
 73
 74  Widget _getButtonRow() {
 75    if (imagePath != null) {
 76      return Align(
 77        alignment: Alignment.bottomCenter,
 78        child: FloatingActionButton(
 79          foregroundColor: Colors.white,
 80          child: Icon(Icons.arrow_back),
 81          onPressed: () {
 82            setState(() {
 83              edgeDetectionResult = null;
 84              imagePath = null;
 85            });
 86          },
 87        ),
 88      );
 89    }
 90
 91    return Row(
 92      mainAxisAlignment: MainAxisAlignment.center,
 93      children: [
 94        FloatingActionButton(
 95          foregroundColor: Colors.white,
 96          child: Icon(Icons.camera_alt),
 97          onPressed: onTakePictureButtonPressed,
 98        ),
 99        SizedBox(width: 16),
100        FloatingActionButton(
101          foregroundColor: Colors.white,
102          child: Icon(Icons.image),
103          onPressed: _onGalleryButtonPressed,
104        ),
105      ]
106    );
107  }
108
109  Padding _getBottomBar() {
110    return Padding(
111      padding: EdgeInsets.only(bottom: 32),
112      child: Align(
113        alignment: Alignment.bottomCenter,
114        child: _getButtonRow()
115      )
116    );
117  }
118}
We make it a stateful widget because we have certain variables here that can change during the lifetime of this widget that should be managed by the widget itself:
controller: TheCameraController– this is necessary to take a picture when a button is pressedcameras: The detected cameras on this device. Is being checked at the beginning and then used to initialize the controllerimagePath: The path leading to the current imageedgeDetectionResult: The detection result of the current image
The first thing during state initialization is checking for cameras. If none were found, nothing happens. Otherwise, the camera controller is being initialized with the first found camera which is usually the back facing camera of a smartphone.
Now the root widget inside of the Scaffold is a Stack. We want the camera preview to fill the whole screen if possible and then place the bottom bar with its buttons on top.
_getMainWidget() displays either the camera view when there is no imagePath and no edgeDetectionResult which means no picture has been taken yet or the edge detection preview meaning the image with the detected edges painted on top when both of the variables are set.
The CameraView widget and the EdgeDetectionPreview are yet only placeholders. Let’s implement them.
 1import 'package:camera/camera.dart';
 2import 'package:flutter/material.dart';
 3
 4class CameraView extends StatelessWidget {
 5  CameraView({
 6    this.controller
 7  });
 8
 9  final CameraController controller;
10
11  @override
12  Widget build(BuildContext context) {
13    return _getCameraPreview();
14  }
15
16  Widget _getCameraPreview() {
17    if (controller == null || !controller.value.isInitialized) {
18      return Container();
19    }
20
21    return Center(
22      child: AspectRatio(
23        aspectRatio: controller.value.aspectRatio,
24        child: CameraPreview(controller)
25      )
26    );
27  }
28}
The display logic of the CameraView is fairly simple as it just uses the CameraController of the parent widget to display the CameraPreview. We use an AspectRatio widget in order to have it the same ratio as the stream of images coming from the camera.
The EdgeDetectionPreview has a little bit more code:
 1import 'dart:async';
 2import 'dart:io';
 3import 'dart:math';
 4import 'dart:typed_data';
 5import 'dart:ui' as ui;
 6import 'package:simple_edge_detection/edge_detection.dart';
 7import 'package:flutter/material.dart';
 8
 9class EdgeDetectionPreview extends StatefulWidget {
10  EdgeDetectionPreview({
11    this.imagePath,
12    this.edgeDetectionResult
13  });
14
15  final String imagePath;
16  final EdgeDetectionResult edgeDetectionResult;
17
18  @override
19  _EdgeDetectionPreviewState createState() => _EdgeDetectionPreviewState();
20}
21
22class _EdgeDetectionPreviewState extends State<EdgeDetectionPreview> {
23  GlobalKey imageWidgetKey = GlobalKey();
24
25  @override
26  Widget build(BuildContext mainContext) {
27    return Center(
28      child: Stack(
29        fit: StackFit.expand,
30        children: <Widget>[
31          Center(
32            child: Text('Loading ...')
33          ),
34          Image.file(
35            File(widget.imagePath),
36            fit: BoxFit.contain,
37            key: imageWidgetKey
38          ),
39          FutureBuilder<ui.Image>(
40            future: loadUiImage(widget.imagePath),
41            builder: (BuildContext context, AsyncSnapshot<ui.Image> snapshot) {
42              return _getEdgePaint(snapshot, context);
43            }
44          ),
45        ],
46      ),
47    );
48  }
49
50  Widget _getEdgePaint(AsyncSnapshot<ui.Image> imageSnapshot, BuildContext context) {
51    if (imageSnapshot.connectionState == ConnectionState.waiting)
52      return Container();
53
54    if (imageSnapshot.hasError)
55      return Text('Error: ${imageSnapshot.error}');
56
57    if (widget.edgeDetectionResult == null)
58      return Container();
59
60    final keyContext = imageWidgetKey.currentContext;
61
62    if (keyContext == null) {
63      return Container();
64    }
65
66    final box = keyContext.findRenderObject() as RenderBox;
67
68    return CustomPaint(
69        size: Size(box.size.width, box.size.height),
70        painter: EdgePainter(
71          topLeft: widget.edgeDetectionResult.topLeft,
72          topRight: widget.edgeDetectionResult.topRight,
73          bottomLeft: widget.edgeDetectionResult.bottomLeft,
74          bottomRight: widget.edgeDetectionResult.bottomRight,
75          image: imageSnapshot.data,
76          color: Theme.of(context).accentColor
77        )
78    );
79  }
80
81  Future<ui.Image> loadUiImage(String imageAssetPath) async {
82    final Uint8List data = await File(imageAssetPath).readAsBytes();
83    final Completer<ui.Image> completer = Completer();
84    ui.decodeImageFromList(Uint8List.view(data.buffer), (ui.Image image) {
85      return completer.complete(image);
86    });
87    return completer.future;
88  }
89}
Instead of directly painting the image at the bottom layer of the stack and some edges on top, we do something different: we load the image asynchronously and then use a FutureBuilder to display the image. We do that because we need the dimensions of the scaled image as well as the original dimensions of the image. This way, when we draw the edges on top, we can draw it according to the current scale.
The future which the FutureBuilder is based on, is the Completer of decoding the image that as been read from the given path.
Another advantage is that we can show a preloader in every phase: before the image in the stack is displayed, we show a text saying “Loading …”. While the asynchronous process of loading the image is happening, we show the image. And finally, we paint the edges on top. That does not leave the user with a blank screen until everything is ready.
It’s important that we choose fit: BoxFit.contain to display the image. This way, the image will always fill width or height depending on its aspect ratio. Otherwise, smaller image may appear tiny in the center. In combination with fit: StackFit.expand this leads to the image filling all the available space.
Another significant part is using GlobalKey imageWidgetKey. This way we can reuse the size of the actual rendered Image widget then painting the edges on top. For more information on how to get the size of a widget in the context of another widget, please refer to the official docs.
Now let’s have a look at the CustomPainter being responsible for drawing the image and the edges:
 1class EdgePainter extends CustomPainter {
 2  EdgePainter({
 3    this.topLeft,
 4    this.topRight,
 5    this.bottomLeft,
 6    this.bottomRight,
 7    this.image,
 8    this.color
 9  });
10
11  Offset topLeft;
12  Offset topRight;
13  Offset bottomLeft;
14  Offset bottomRight;
15
16  ui.Image image;
17  Color color;
18
19  @override
20  void paint(Canvas canvas, Size size) {
21    double top = 0.0;
22    double left = 0.0;
23
24
25    double renderedImageHeight = size.height;
26    double renderedImageWidth = size.width;
27
28    double widthFactor = size.width / image.width;
29    double heightFactor = size.height / image.height;
30    double sizeFactor = min(widthFactor, heightFactor);
31
32    renderedImageHeight = image.height * sizeFactor;
33    top = ((size.height - renderedImageHeight) / 2);
34
35    renderedImageWidth = image.width * sizeFactor;
36    left = ((size.width - renderedImageWidth) / 2);
37
38
39    final points = [
40      Offset(left + topLeft.dx * renderedImageWidth, top + topLeft.dy * renderedImageHeight),
41      Offset(left + topRight.dx * renderedImageWidth, top + topRight.dy * renderedImageHeight),
42      Offset(left + bottomRight.dx * renderedImageWidth, top + (bottomRight.dy * renderedImageHeight)),
43      Offset(left + bottomLeft.dx * renderedImageWidth, top + bottomLeft.dy * renderedImageHeight),
44      Offset(left + topLeft.dx * renderedImageWidth, top + topLeft.dy * renderedImageHeight),
45    ];
46
47    final paint = Paint()
48      ..color = color.withOpacity(0.5)
49      ..strokeWidth = 2
50      ..strokeCap = StrokeCap.round;
51
52    canvas.drawPoints(ui.PointMode.polygon, points, paint);
53
54    for (Offset point in points) {
55      canvas.drawCircle(point, 10, paint);
56    }
57  }
58
59  @override
60  bool shouldRepaint(CustomPainter old) {
61    return true;
62  }
63}
The crucial part is where we determine the renderedImageWidth and renderedImageHeight. Because we make use of BoxFit.contain, we know that the image does not fill the whole screen. Instead, the longest side fits into the screen making it possible for bars to appear along the shorter side. If we don’t do anything, the Painter will draw the edges based on the assumption that the aspect ratio of the rendered image is equal to the one from the original image. We calculate the factor to adjust the dimensions of the painted edges.
Okay now we have a Screen that displays the camera preview image and two buttons, but yet, the buttons do not trigger anything. Let’s change that.
 1Future _detectEdges(String filePath) async {
 2  if (!mounted || filePath == null) {
 3    return;
 4  }
 5
 6  setState(() {
 7    imagePath = filePath;
 8  });
 9
10  EdgeDetectionResult result = await EdgeDetector().detectEdges(filePath);
11
12  setState(() {
13    edgeDetectionResult = result;
14  });
15}
16
17void onTakePictureButtonPressed() async {
18  String filePath = await takePicture();
19
20  log('Picture saved to $filePath');
21
22  await _detectEdges(filePath);
23}
24
25void _onGalleryButtonPressed() async {
26  final picker = ImagePicker();
27  final pickedFile = await picker.getImage(source: ImageSource.gallery);
28  final filePath = pickedFile.path;
29
30  log('Picture saved to $filePath');
31
32  _detectEdges(filePath);
33}
If we have a filePath which means that an image was either taken by the camera or chosen from the gallery, we start the edge detection. The result is then set to the member variable of our widget.
This _detectEdges() method is called both from the callback of the camera button and from the gallery button as soon as the filePath is obtained.
Now what’s missing is the EdgeDetector. This class is responsible for calling the class EdgeDetection from our package that forwards the call to the native code. We need to take care of the UI not being blocked during that call.
 1import 'dart:async';
 2import 'dart:isolate';
 3
 4import 'package:simple_edge_detection/edge_detection.dart';
 5
 6class EdgeDetector {
 7  static Future<void> startEdgeDetectionIsolate(EdgeDetectionInput edgeDetectionInput) async {
 8    EdgeDetectionResult result = await EdgeDetection.detectEdges(edgeDetectionInput.inputPath);
 9    edgeDetectionInput.sendPort.send(result);
10  }
11
12  Future<EdgeDetectionResult> detectEdges(String filePath) async {
13    // Creating a port for communication with isolate and arguments for entry point
14    final port = ReceivePort();
15
16    // Spawning an isolate
17    Isolate.spawn<EdgeDetectionInput>(
18      startEdgeDetectionIsolate,
19      EdgeDetectionInput(
20        inputPath: filePath,
21        sendPort: port.sendPort
22      ),
23      onError: port.sendPort,
24      onExit: port.sendPort
25    );
26
27    // Making a variable to store a subscription in
28    StreamSubscription sub;
29
30    // Listening for messages on port
31
32    var completer = new Completer<EdgeDetectionResult>();
33
34    sub = port.listen((result) async {
35      // Cancel a subscription after message received called
36      await sub?.cancel();
37      completer.complete(await result);
38    });
39
40    return completer.future;
41  }
42}
43
44class EdgeDetectionInput {
45  EdgeDetectionInput({
46    this.inputPath,
47    this.sendPort
48  });
49
50  String inputPath;
51  SendPort sendPort;
52}
For the call to be non-blocking, it’s not sufficient to use Futures. That’s because a Future uses Dart’s event loop to schedule a task for some time in the future. However, if it’s very demanding computation, it’s not sufficient to do that because it shares resources with the other parts of the code. To start a part of the program that is highly independent, we need to go for Isolates.
The spawn() method of the isoalte expects a static method, an argument and a port on which the spawning component can receive errors or the information that the isolate has finished.
Since we can only supply a single argument, we need to wrap our input path and our sendPort in a class. The sendPort is very important as it’s the way of communicating from the isolate back to the caller. We need this to receive the result of our edge detection. When the isolate calls send on the send port, we receive and event on the receive port. That’s why we need to listen to it. We create a Future and by the time the listener on the port receives the result, we complete the future with the received data.
Result
Okay, we’re done. That’s what our final result looks like:

Pretty cool! There are still a lot of things to improve like resizing the image to a maximum size because of possible performance and memory issues. Or using the image stream from the camera to display a live preview of the edge detection. But for now, to show how things can be done, this is it.
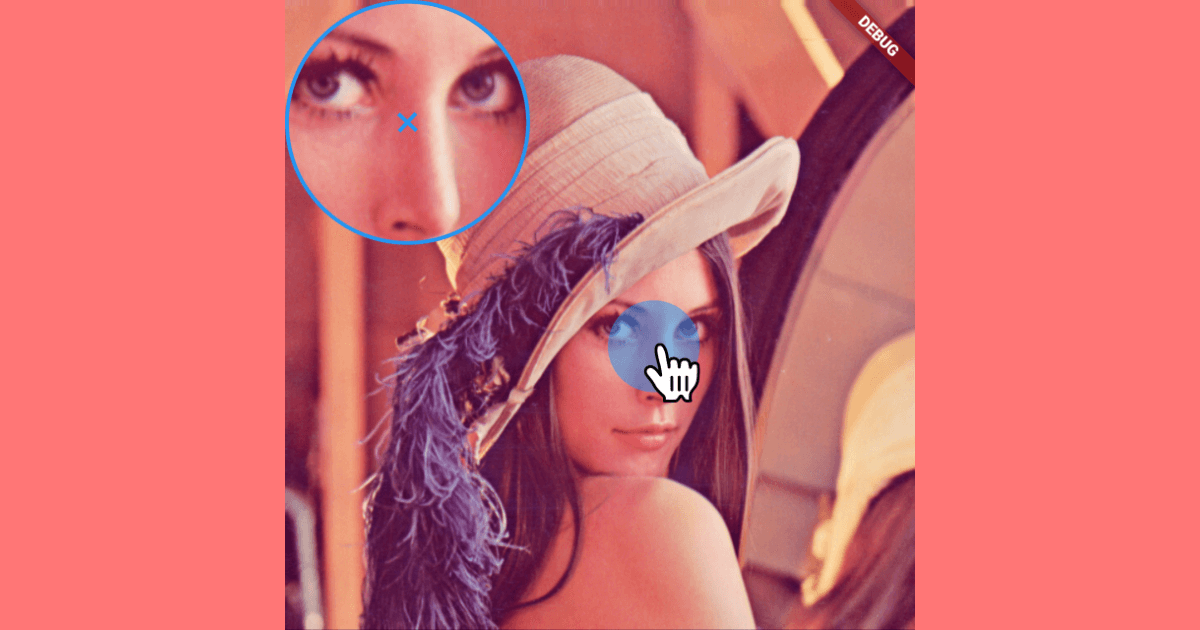
An improvement was made afterwards: I added a magnifier that lets you easily position the touch bubbles without the finger covering the area that is crucial. The tutorial can be found here.
The full code can be found here:
GET FULL CODENote, that I could not include all the OpenCV builds into the GitHub repository. You need to perform the steps of downloading (like it’s mentioned under project setup) yourself.


Đạt
Marc
In reply to Đạt's comment
Đạt
In reply to Marc's comment
Marc
In reply to Đạt's comment
ganesh
In reply to Marc's comment
Ganesh c kumar
In reply to ganesh's comment
Marc
In reply to Ganesh c kumar's comment
Androidena
Marc
In reply to Androidena's comment
Adarsh Hegde
Marc
In reply to Adarsh Hegde's comment
Prathmesh
Marc
In reply to Prathmesh's comment
Prathmesh
In reply to Marc's comment
Marc
In reply to Prathmesh's comment
Chris von Wielligh
Marc
In reply to Chris von Wielligh's comment
ZooL
Marc
In reply to ZooL's comment
Farhan Shaikh
In reply to Marc's comment
Marc
In reply to Farhan Shaikh's comment
Antoine
Marc
In reply to Antoine's comment
Antoine
In reply to Marc's comment
Marc
In reply to Antoine's comment
Murad Kakabaev
In reply to Antoine's comment
Antoine
In reply to Murad Kakabaev's comment
KA
Marc
In reply to KA's comment
ZooL
In reply to Marc's comment
Thinh
In reply to ZooL's comment
Nemo
In reply to ZooL's comment
Peter
Marc
In reply to Peter's comment
Shubham
In reply to Marc's comment
Marc
In reply to Shubham's comment
Dzhamil
Marc
In reply to Dzhamil's comment
Shubham
Chris von Wielligh
Marc
In reply to Chris von Wielligh's comment
Aamil Silawat
Marc
In reply to Aamil Silawat's comment
Aamil Silawat
Marc
In reply to Aamil Silawat's comment
Aamil Silawat
In reply to Marc's comment
Sunny Bamaniya
In reply to Marc's comment
Steve
In reply to Sunny Bamaniya's comment
Marc
In reply to Steve's comment
Chris von Wielligh
In reply to Sunny Bamaniya's comment
Michael Canin
Marc
In reply to Michael Canin's comment
Michael Canin
In reply to Marc's comment
Juan Terven
Marc
In reply to Juan Terven's comment
Mansi Bhatt
Thinh
Abbass Sharara
Abbass Sharara
In reply to Abbass Sharara's comment
Md. Nazimul Haque
Marc
In reply to Md. Nazimul Haque's comment
parisa
vishnu
Navaneeth B
Can
Marc
In reply to Can's comment
Can
In reply to Marc's comment
EC
Jayaram Yakkala
jay ram
gwinter
In reply to jay ram's comment
sander
Marc
In reply to sander's comment
Kwarc
tuncay
Ranulfo Souza
Josh
k-yone
In reply to Josh's comment
el mehdi tonzar
In reply to Josh's comment
Ankush Das
Marc
In reply to Ankush Das's comment
Robson Reis
Marc
In reply to Robson Reis's comment
Abhishek Chauhan